Tensorflow学习--MNISTT识别

尝试使用Tensorflow,教程为基础项目MNIST手写数字识别

Softmax回归

是一个线性的多类分类模型,实际上是从Logistic回归模型转化而来,区别于Logistic是二类分类模型,而他是多类分类模型
Softmax 函数的主要功能是将各个类别的分数转化为合理的概率值,例如一个样本可能属于3个类别,第一个个类别的打分为’a’,第二个类别的打分为‘b’,第三个类别的打分为‘c’。打分越高代表属于这个类别的概率越高,但是打分本身不代表概率,因为打分的值可以是负数,也可以很大,但概率要求僵必须在0~1,并且三类的概率加起来应该等于l。那么,如何将(a,b,c)转换成合理的概率值呢?方法就是使用Softmax函数:

TIM截图20180830205730

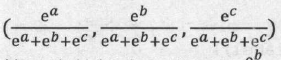
使得每个的分数都为正数且三个数值都在0~1之间,数值之和为1

假设x 是单个样本的特征, W、b 是Softmax模型的参数。在MNIST数据集中, x就代表输入图片,它是一个784维的向量,而W是一个矩阵,而W的形状为(784, 10),b是一个10维的向量, 10代表的是类别数。Softmax模型的第一步是通过下面的公式计算各个类别的Logit:

TIM截图20180830211254

而Logit是一个10维的向量,而可以使用Softmax函数将它转换成各个类别的概率值

Softmax回归在Tensorflow中的实现—MNIST实验

1
2
3
4
5
6
7
8
9
10
11
12
13
14
15
16
17
18
19
20
21
22
23
24
25
26
27
28
29
30
31
32
33
34
35
36
37
38
39
40
41
42
43
44
45
46
47
48
49
50
51
52
53
54
55
56
57
58
59
60
import scipy.misc
import os
from PIL import Image
import tensorflow as tf
import tensorboard

# 从tensorflow.examples.tutorials.mnist引入模块。这是TensorFlow为了教学MNIST而提前编制的程序
from tensorflow.examples.tutorials.mnist import input_data
# 从MNIST_data/中读取MNIST数据。这条语句在数据不存在时,会自动执行下载
mnist = input_data.read_data_sets("MNIST_data/", one_hot=True)

#定义输入输出以及中间层
#定以好名称域(Name scoping)与节点(Node)
with tf.name_scope('inputs'):
x = tf.placeholder(tf.float32,[None,784],name='x_input')

#定义中间层,包括weight和bias矩阵
with tf.name_scope('layer1'):
with tf.name_scope('weights'):
W = tf.Variable(tf.zeros([784,10]),name='W')
tf.summary.histogram('layer1_weights',W)
with tf.name_scope('bias'):
b = tf.Variable(tf.zeros([10]),name='b')
tf.summary.histogram('layer1_bias',b)

#使用Softmax回归比较预测值与真实值的差异程度,并以此计算下一步的损失函数
y = tf.nn.softmax(tf.matmul(x,W) + b)

y_ = tf.placeholder(tf.float32,[None,10])

#损失函数
with tf.name_scope('loss'):
cross_entropy = tf.reduce_mean(-tf.reduce_sum(y_ * tf.log(y)))
tf.summary.scalar('loss',cross_entropy)

#训练过程--使用梯度下降法
with tf.name_scope('train'):
train_step = tf.train.GradientDescentOptimizer(0.01).minimize(cross_entropy)

#初始化session
#需要注意的是,实验过程中发现,由于多次申请session且未及时关闭,导致了GPU占用过高,导致了报错,需要注意
sess = tf.Session()
#merged用于整合所有图例,需要在后期的训练过程中反复调用
merged = tf.summary.merge_all()
#生成Graph
writer = tf.summary.FileWriter("logs/",sess.graph)

#初始化Session
init = tf.global_variables_initializer()
sess.run(init)

for i in range(1000):
batch_xs, batch_ys = mnist.train.next_batch(100)
sess.run(train_step, feed_dict={x: batch_xs, y_: batch_ys})
if i%50==0:
result = sess.run(merged,feed_dict={x:batch_xs, y_:batch_ys})
writer.add_summary(result, i)

#注意关闭啊,GPU占用呀
sess.close()

实验结果

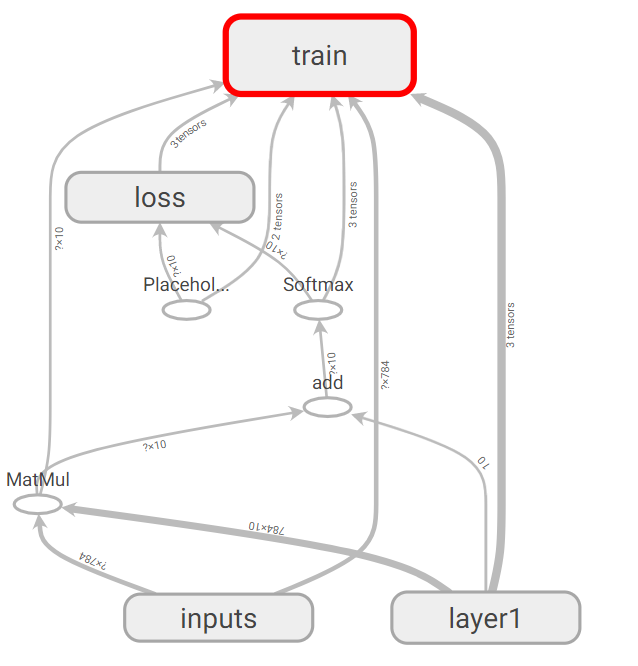
通过Tensorboard能够直观地看到训练的过程与训练的结构

1.Graph

TIM截图20180831165914

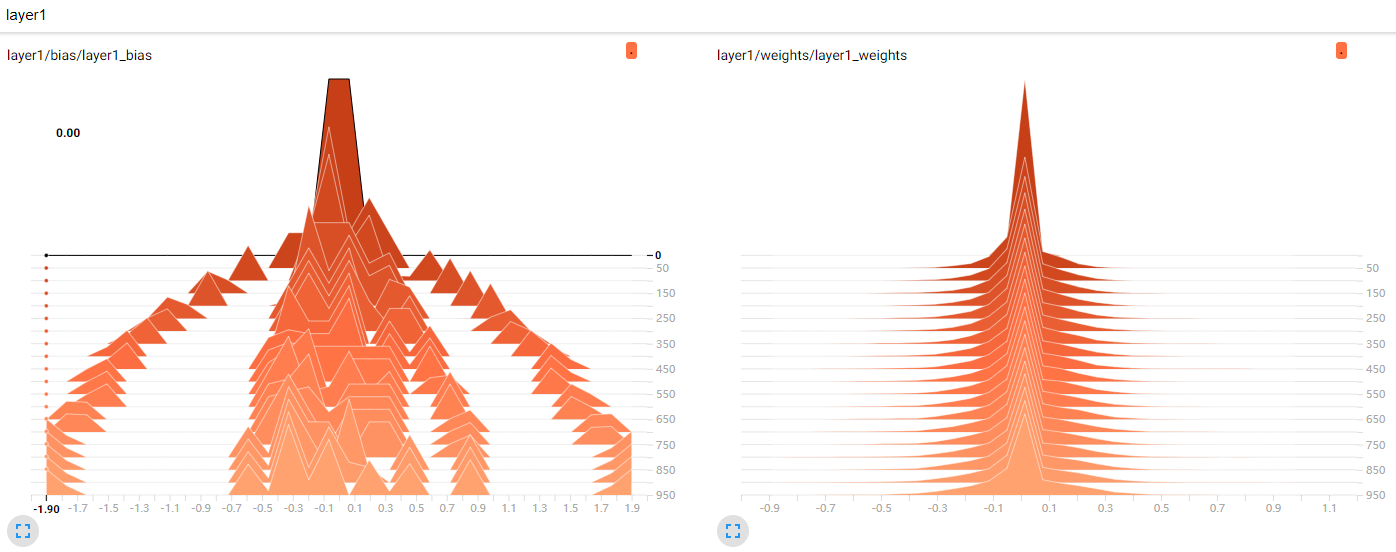
2.Histogram 中间层Weights和Bias
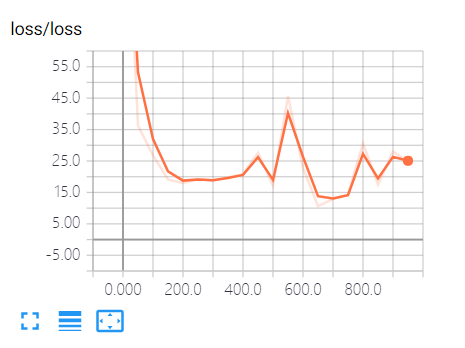
TIM截图20180831165849

3.训练过程的损失函数变化:

TIM截图20180831165956

4.准确率

1
2
3
4
5
6
7
8
9
10
11
12
13
14
15
16
17
18
19
20
21
22
23
24
25
26
27
#正确的预测结果
#tf.argmax:返回矩阵中最大值的索引,而事实上tf.argmax就是np.argmax,tensorflow使用numpy实现的这个API
# l y方向 axis=1的时候,返回沿着y轴的所有x最大值下标。
# l [1, 2, 3] -->2
# l [2, 3, 4] -->2
# l [5, 4, 3] -->0
# l [8, 7 ,2] -->0
# --------------------------> x方向
# [3, 3, 1] <-- 当axis=0的时候,返回沿着x轴的所有y值的最大下标。
correct_prediction = tf.equal(tf.argmax(y, 1), tf.argmax(y_, 1))


#计算预测准确率
#tf.cast(correct_prediction, tf. float32 )将比较值转换成float32 型的变量,此时True 会被转换成l , False 会被转接成0 。
# 'x' is [[1., 2.]
# [3., 4.]]
#tf.reduce_mean(x) ==> 2.5 #如果不指定第二个参数,那么就在所有的元素中取平均值
#tf.reduce_mean(x, 0) ==> [2., 3.] #指定第二个参数为0,则第一维的元素取平均值,即每一列求平均值
#tf.reduce_mean(x, 1) ==> [1.5, 3.5]

accuracy= tf.reduce_mean(tf.cast(correct_prediction, tf.float32))
#在Session运行Tensor 可以得到Tensor的值
#这里是获取最终模型的准确率
print(sess.run(accuracy,feed_dict={x:mnist.test.images,y_:mnist.test.lab
els}))

0.9185
0%